The new Google Sign In SDK for iOS is out! With a new version number, and separated from the old Google+ SDK, the Sign-In SDK should make it easier and faster to implement Google Sign-In in your app. Lets take a look at how to use it from Swift.
Unfortunately the library isn’t available from Cocoapods yet, so you’ll have to drop it in manually. Setup is pretty easy: add in the GoogleSignIn.framework from the zip download and add the system AddressBook and SystemConfiguration frameworks. If you want to use the supplied button, you’ll also need to add the GoogleSignIn.bundle from the SDK zip which contains the fonts, images and translations for the standard button - using the Add Files to “project” menu option should automatically set it in the Copy Bundle Resources part of your build step.

If your sign in button is invisible when you launch the app, you probably haven’t copied the GoogleSignIn.bundle from the SDK zip file.
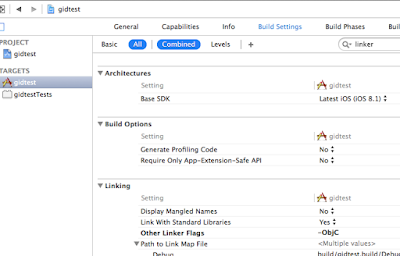
In the Build Settings phase, add -ObjC in Other Linker Settings (you may need to toggle to “All” from “Basic” at the top). This is needed as the SDK contains categories which otherwise aren’t loaded - so if you see any errors around standard foundation classes with suspiciously Google oriented (Categories) on them, missing this flag is likely the culprit.

The final bit of general setup is creating an iOS client ID in the Google Developers Console and setting up a custom URL type, so that the user can be redirected back to your app. The way Google Sign In works is by sending the user to either a Google app or Safari to authenticate, then (on success or failure) redirecting the user to your app. There’s no standard way of triggering that redirect on iOS, so we need to have a unique custom URL type set up for each app. My client ID from the console is 366667191730-38onttdkl2cpqstheip1ek3r5tb8s5ds.apps.googleusercontent.com, so I reverse it for my custom URL scheme.

Note: Those familiar with Google+ Sign-In will remember we used to use the reversed bundle ID, but actually this client ID approach has been supported for some time, and is more reliably structured like a domain name. If you’re setting up sign-in for multiple apps, its best to use a different client ID (in the same console project) for each so that the user doesn’t accidentally get sent to the wrong one.
Next we have to add a bridging header so our Swift project can access the Google Sign-In SDK. There’s a little trick we can use: go to Supporting Files in the project view on the left, right click and select New File > Objective-C File and call it “temp”. When xcode asks about configuring a bridging head, say yes. Now delete temp.m, and you have a bridging header file added and configured, which is nice! In that file, add the Google Sign-In header: #import <GoogleSignIn/GoogleSignIn.h>

Now we can use the Sign-In SDK from anywhere in our Swift project. First, lets add our sign in button. Go to your Storyboard, add a UIView and set the class to GIDSignInButton. Its already plugged in to the GIDSignIn singleton, so you don’t have to do any setup. Use the assistant to add a outlet to your viewController. For now we’ll just hide this button to show we’ve signed in.

For those familiar with GPPSignInButton note this is now a UIControl rather than UIButton.
We need to configure the GIDSignIn instance in our AppDelegate. We set up the client ID that we generated in the console project (right way round this time), and also pass through the handleURL call so GID can process the callback. Make sure to set the client ID before calling the URL handler though! We would also set any initial API scopes we want to use here by adding them to the GIDSignIn.scopes array property.
Finally, in the ViewController we implement the normal sign in process. First we set the signIn delegate to ourselves, and implement the GIDSignInDelegate protocol. We then attempt to sign in silently - this checks whether the user already has an authentication in the keychain - if they do, and its still good, we’ll get the didSignInForUser callback shortly after. If not, the callback will be triggered when the user taps the sign in button and then is redirected back to the app after completing the sign-in flow.
Next, you can do all the normal sign in things like request additional scopes incrementally and authorise a server.
The GIDGoogleUser object there will have a .userID property you can use as a primary key in any user database, and if you set GIDSignIn.shouldFetchBasicProfile or have email in your GIDSignIn.scopes array, you will get the email address in .profile.email. The GIDProfileData object in .profile is pretty helpful for people who want to display an avatar as well - the .hasImage property indicates whether or not they have a profile image available, and imageURLWithDimensions: will give you back a URL for an appropriately sized picture.
There is also a new delegate which is of great use in making a more responsive ui: GIDSignInUIDelegate. This will give you a callback once the sign-in resolution has finished, and the GIDSignInDelegate will be called or the user redirected to the consent screen. This gives you the opportunity to display a activity indicator or hold off activating parts of the UI until you have a known sign in state for the user, which is very helpful in building a more consistent user experience. GIDSignIn also lets you disable signing in with a browser with GIDSignIn.allowsSignInWithBrowser, in case you only want a sign in experience with a native Google app, which can be a lot smoother for the user.
